Building a NixOS MiniRack with Raspberry Pi 5s
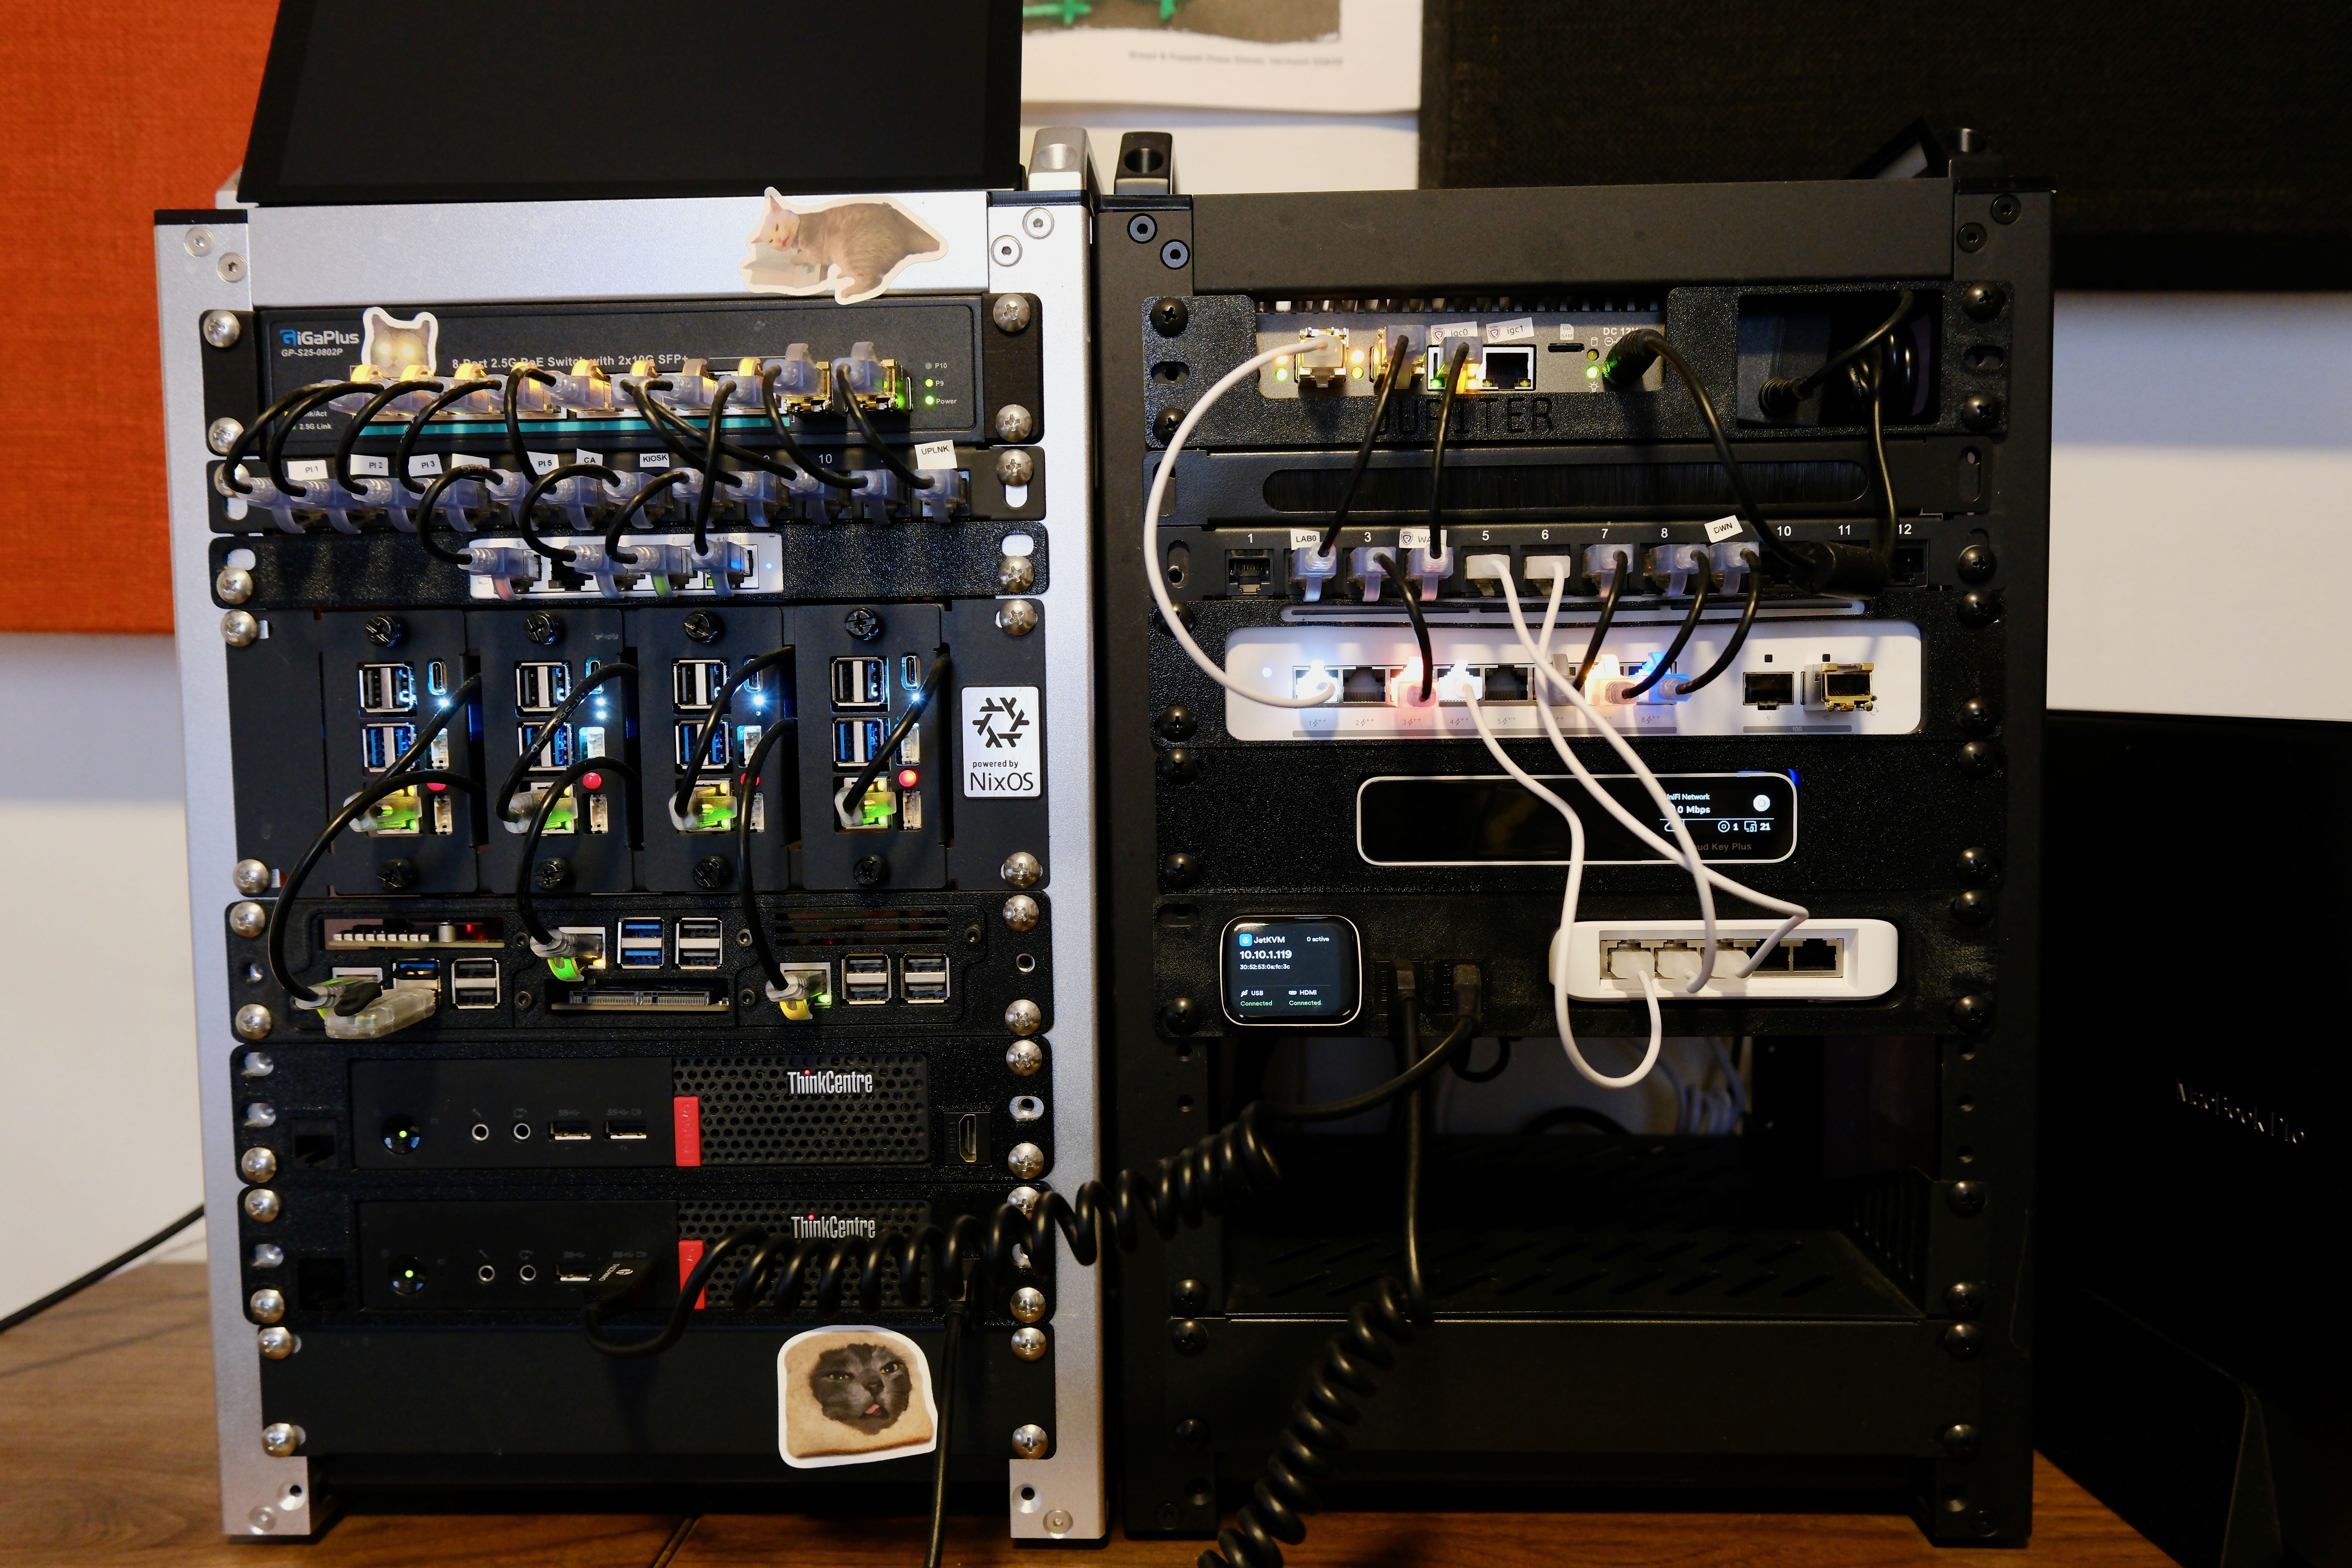
Every time I’ve tried to self-host something, I end up with a neglected
single-board computer in a dusty corner of my basement on a version of Ubuntu
Server. I loved the idea of self-hosting useful apps: an IRC Bouncer,
Atuin, or Actual Budget. I
wanted something I could set up and run with minimal intervention. After a
month, I would start to forget the software I installed, or the little
configuration quirks I made to make it work. My experiments ended with an
apt upgrade or updated Docker image requiring me to re-learn everything I did
to make my server work in the first place. I would lose interest quickly.
In January 2025, I discovered Jeff Geerling’s YouTube channel. If you don’t know who Jeff Geerling is, they cover a smattering of tech subjects on YouTube and on their blog. I dabbled with a few small devices in the past for self-hosting, and my old copy of Kubernetes for Dummies was beckoning.
This time would be different. I’m a huge NixOS fan; I use it on anything I can. Nix allowed me to set up my machines declaratively, and I never felt like there was “random” software floating around I forgot about. I started thinking about how I could use NixOS to manage my self-hosted devices.
Naming Scheme
I wanted a cool naming scheme. I like Jupiter. Jupiter is easy because of its moons. Honestly, I think the naming scheme is a bit of a cliché, but I like it. I even 3D-printed “Jupiter” into the Firewall/Router/Gateway/DNS :).
Figuring out the bare minimum
I wanted to have a place to deploy my experiments, without resorting to AWS or fly.io. It needed a similar developer experience—something where I could throw up my Nix-built Docker Images and have a working host on my internal LAN. Finally, I wanted updates to be easier. If I’m running 3+ devices, I am not SSH’ing each time to run a script manually. It had to be updatable.
Why NixOS
Nix's determinism and declarative configuration made it attractive for managing configuration across multiple nodes. Nix opens the door for caching, or even potentially automated deploys from a binary cache (like cachix).
There are a few well-known “nix-ops” tools around. I reached for Colmena. I came across it on GitHub before, and it's also a Rust tool (which I always appreciate).
During this project, Raspberry Pis struggled to compile larger pieces of
software. Software for aarch64-linux did not always appear in the binary cache
for nixos-raspberrypi. Setting up an on-demand beefy build server on AWS to
speed up deploys is a great cure for my impatience at the cost of a few dollars.
NixOS makes this workflow easy.
Why K3s
I decided K3S is the way. K3S is a lighter distribution of K8S that I run with
the embedded etcd. Part of this project was meant to help me learn Kubernetes,
and K3S would let me run the Docker Images with the workflow I expected.
Kubenix
The one thing unattractive with regards to Kubernetes, however, was the YAML manifest format. Spending way too much time configuring GitHub Actions scarred me. In addition to my hesitancy with YAML, using Kubernetes would mean the project is split between Nix and Kubernetes Manifests. It would require extra verification steps ensuring the parts worked well in isolation and as a whole. Part of the system would be defined in Nix (The OS configuration, services, packages, Kubernetes software itself), while the other would be YAML.
This discrepancy made me wish a Nix-y way of configuring at least the platform
to deploy existed. Luckily, I found the
Kubenix project. Kubenix allows configuring
Kubernetes state with Nix. It is first defined in Nix, then the kubenix
command outputs built Kubernetes manifests. Kubenix handles pruning old state,
so deployments more accurately reflect what exists on the cluster.
Kubenix solved this problem for me. With Kubenix I could have:
- one language for everything
- resource types type-checked against the API schema at eval time
- hash-pinned charts
- prune on apply
This way, I enabled configuring the platform for my apps (OS Hosts, Load Balancer, Observability, Metrics) in one language. ArgoCD would let me still use kubernetes manifests if I wished.
Versatility
Kubernetes comes with a whole bunch of goodies baked in. HA/LoadBalancing/Self-Healing, etc. But above all, I liked the extensibility. If I wanted, I could (and did!) add ArgoCD for an alternate means of deployment with pure Kubernetes manifests (like my website).
Updates
The update flow I settled on is Renovate to update helm chart/docker image
versions in Kubenix definitions. I merge those in GitHub CI, then update the Nix
hashes manually next time I pull/want to update. Then I run a single
colmena build --on @homelab to build everything at once (with my AWS build
server if I need it), then colmena apply --on @homelab. Updates resulting in
breaking changes imply time spent fixing things. Renovate is nice insofar as it
sometimes gives a list of changes in the updated versions, so I get some
warning. Having control over when updates occur, the bulk
application/deployment is a huge improvement over my previous self-hosting
attempts. Improvements can be made with automated Cachix/binary cache deploys,
for instance. I haven’t explored this much yet, though, as the current update
flow suits my needs.
I extracted relevant bits for this post into nixos-rpi-lab from Jupiter. There’s a lot to cover here, so this is probably “part 1” of a series.
Bill of Materials
For the initial version, listed is what I ended up with this to host three Kubernetes Control nodes. The K3S control plane nodes double as worker nodes. While this uses three nodes, it is possible to run K3S on a single node if one desires. I did not have a 3d printer at this point, and went with the GeeekPi rack they sell. The RPi5 piece includes an NVMe SSD adapter.
- 3x Raspberry Pi
- 3x Official Raspberry Pi Active Cooler
- 3x NVMe SSDs (luckily I got in before prices went insane)
- 1x GeeekPi 10 Inch 2U Rack Mount for Raspberry Pi 5
- or whatever you got to organize the Raspberry Pis with your switch
- 1x PoE switch to power the Pis. I went with the GigaPlus 2.5G PoE Switch
- 3x PoE HATs, I went with the one from Waveshare since it is compatible with the active cooler
- One of the GeekPi 10” Racks to hold all the hardware.
- If you have a 3D printer, I would recommend printing a KWS Rack instead
- A couple of SD cards for the initial NixOS install
Architecture
For the first version, the architecture ended up looking like this:
 ┌─ jupiter.lan ──────────────────────────────────────────┐
 │                                                        │
 │    ┌─────────────────┐                                 │
 │    │ Jupiter         │                                 │
 │    │ Router/Firewall │                                 │
 │    └────────┬────────┘                                 │
 │             │                                          │
 │ ┌─ k3s cluster ──────────────────────────────────────┐ │
 │ │           │                                        │ │
 │ │           ▼              ┌─ control plane (k3s) ─┐ │ │
 │ │   ┌───────────────┐      │ ┌───────────────────┐ │ │ │
 │ │   │ MetalLB VIPs  │      │ │ ganymede (leader) │ │ │ │
 │ │   │ 10.10.68.1    │      │ └───────────────────┘ │ │ │
 │ │   └───────────────┘      │ ┌───────────────────┐ │ │ │
 │ │                          │ │ io                │ │ │ │
 │ │                          │ └───────────────────┘ │ │ │
 │ │                          │ ┌───────────────────┐ │ │ │
 │ │                          │ │ europa            │ │ │ │
 │ │                          │ └───────────────────┘ │ │ │
 │ │                          └───────────────────────┘ │ │
 │ └────────────────────────────────────────────────────┘ │
 └────────────────────────────────────────────────────────┘
Templates
The Nix templates consist of two portions: the lab configuration and the secrets configuration. While secrets exist encrypted with age and sops-nix, the secrets configuration is separate to enable storing the encrypted sops secrets in a private repository.
Set up nixos-rpi-lab in one spot, and secrets in another:
nix flake init -t github:insipx/nixos-rpi-lab#lab

# secrets
nix flake init -t github:insipx/nixos-rpi-lab#secrets
Change the inputs of the lab repository to reference the secrets repository,
inputs = {
  nixpkgs.url = "github:NixOS/nixpkgs/nixpkgs-unstable";
  nixos-raspberrypi = {
    url = "github:nvmd/nixos-raspberrypi/main";
  };
  lab-secrets = {
    # if you push it to a git repo, ensure you have
    # nix setup with your GitHub access token to clone
    # or use a git+ssh: path
    # url = "github:you/your-lab-secrets-repo";
    url = "path:/home/hunter2/path/to/secrets";
  };
   # ...
};
This will get you this directory structure for the #lab.
.

├── base/                 # NixOS Config used by everything.
│                         # Modify the user config here.
├──┐deployments/          # Stuff that's deployed to the cluster
│  └── kubenix/           # Kubernetes resources defined with Kubenix
├── hive/                 # NixOS Configurations for each node
└──┐ machine-specific/    # Machine-specific NixOS Configuration
   └── rpi5/              # RPi 5 hardware and kernel settings
#secrets consists of:
├── .sops.yaml    # sops public keys/metadata
├── flake.nix     # devshell with needed tools
├── keyscan.sh    # script to scan & convert public keys to `age`
├── module.nix    # some sops options/enabling K3S secrets
We’re going to focus on how to set up the RPI’s first; leave the secrets
configuration alone for now. It will be used for storing the shared k3s_token
for cluster authentication.
For setting up the Raspberry Pis, we care about two things:
- the initial SD-Card image.
- the
nixos-anywherecommand to push the first configuration.
Setting up the Pis
For initial installation, nvmd/nixos-raspberrypi has great info/examples. The first step, after getting all the right materials, is figuring out how to get NixOS onto the Raspberry Pi in the first place.
I this approach:
- Build & Flash the
NixOSRaspberry Pi image onto the SD card. - Modify the configuration in
installer_images.nixto let yourself SSH to the Pi after the SD image is booted. - Use
nixos-anywhereto apply the initial configuration, which includes the NVMe filesystem configuration. - Remove the SD card to force the Pi to boot from NVMe. This is important for debugging. If something goes wrong, we can insert the original SD image to access a nix-chroot environment and fix it.
The SD image we build is initialInstall. This image will include all the NixOS
configuration modules in base/ and machine-specific/rpi5. This includes the
custom kernel from nvmd/nixos-raspberrypi and other quality-of-life packages.
This explicitly excludes filesystem.nix, which is set up in the next step with
Disko. This is where you should modify the SSH keys and other configuration you
might want on the Pis, like the specific terminfo package of your favorite
terminal emulator, or a preferred text editor. This SD Card will be reusable for
any further Raspberry Pis you set up.
Once ready, the commands are roughly,
# build & the image, from the #lab flake repository
nix build .#sdImages.initialInstall

# extract the zstd to an `.img` file somewhere
zstd -d result/sd-image/nixos-installer-rpi5-kernel.img.zst -o nixos-installer-rpi5-kernel.img

# Flash to an SD card; ensure the `/dev/sdX` path is correct.
sudo dd if=nixos-installer-rpi5-kernel.img of=/dev/sdX bs=4M status=progress conv=fsync
Inserting the SD card and starting the RPI (with a screen attached), you will see a screen that lists a user to log in, an IP Address, and other information. In the past, I’ve found the IP by checking DHCP leases for anything new. You should be able to SSH, which is important for the nixos-anywhere command.
nixos-anywhere
Once the SD card is installed, the next step is making use of the connected NVMe Drive. K3S can be write-heavy; an NVMe will last longer than an SD card. This setup would work with SD cards; however, expect performance degradation.
The configuration uses Disko for initial disk setup. The setup is almost completely verbatim the example in nixos-raspberrypi. The one difference is important, because it enables Longhorn.
Towards the bottom, an ext4 volume is defined. The homelab module allows
configuring the volume size (on initial install). The size is defined in the
rpiHomeLab module. Longhorn does not work with ZFS; we need to create an
overlay to make use of it. This can be skipped if the install is a pure SD-card
install or if you choose a filesystem other than ZFS.
disko.devices.zpool.rpool.datasets."longhorn-ext4" = {
    type = "zfs_volume";
    content = {
        type = "filesystem";
        format = "ext4";
        mountpoint = "/var/lib/longhorn";
        mountOptions = [ "noatime" "discard" ];
    };
};
Apply the initial NixOS configuration and set up the NVMe external disk with ZFS
by using nixos-anywhere
nixos-anywhere --flake .#initialInstall root@your_node_ipThis will install and reboot. Then you can remove the SD card and reboot into the NixOS install from the NvME.
The HomeLab NixOS Module
Much of the per-node configuration exists in the homelab module I created for configuring nodes. The documentation lists available options. Hive configuration has some default values set. An example configuration looks like
rpiHomeLab = {
  networking = {
    interface = "end0";
    hostId = "a1b2c3d4"; # Use a unique value for each node.
    hostName = "worker-01";
    address = "10.10.69.20/22";
  };

  k3s = {
    enable = true;
    leader = false;
    agent = true;
    leaderAddress = "https://10.10.69.10:6443";
    longhorn = true;
    longhornDiskSize = "800G"; # Adjust for this node's available storage.
  };
};
longhornDiskSize should be changed depending on the nodes' available storage.
Leave some room for the OS; in this case, 800G gives 800 Gigabytes for
Longhorn and leaves ~200 Gigabytes for the OS. Longhorn itself can be disabled
with longhorn = false. This will avoid creating the ext4 ZFS volume.
The module is meant to simplify per-node configuration, and is loaded with some fixes to make a k3s setup on Raspberry Pis with ZFS work.
Deploying with Colmena
Per-node configuration
exists in the hive.
Control nodes are tagged control, and each node gets a homelab tag. Build
everything with
colmena build --on @homelab

# Or build a single node with
colmena build --on node1

# Apply/deploy the nodes with
colmena apply --on @homelab

# or for a single node
colmena apply --on node1
Ensure each node has a user with your SSH key on it, setting it in the Colmena configuration.
deployment = {
  targetHost = "node1.lab.lan";
  targetUser = "user";
  tags = [
    "homelab"
    "control"
  ];
};
At this point, colmena should be able to build/apply to nodes. Ensure that k3s
is disabled, however, since k3s requires extra steps to bootstrap the secret
correctly.
Setting up Secrets
In order for k3s to work, it needs a shared token for nodes to join the network. Since in this guide we are setting up three control plane nodes, they will all have access to the server token. If you set up additional worker nodes, they should use a separate worker token, which restricts what a worker node can do with the cluster.
Bootstrapping the k3s secret and leader node
Before we do anything, we need to set up the leader with a secret, then copy the full server token k3s generates from that leader, and replace k3s_token in our SOPS secrets with that token.
Set up SOPS secrets repository
At the start, we initialized a secrets repository but didn’t use it. In
.sops.yaml of the secrets repository, add the public keys to encrypt with. It
looks like this:
# Also see https://github.com/Mic92/dotfiles/blob/d6114726d859df36ccaa32891c4963ae5717ef7f/nixos/.sops.yaml
# for a more complex example.
keys:
  - &admin age1yubikey1qw0ux80u4fpkrl7xuqap8hufkjey3tfrnhcwge5dmzwnrstlv4g8u9ztmdj
  - &node_1 age1nzefcfqa5kzjz47paehsqqxpcm4lmpe7902kzevcva546v8x95hqf540wg
creation_rules:
  - path_regex: secrets/[^/]+\.(yaml|json|env|ini)$
    key_groups:
      - age:
          - *admin
          - *node_1
I store my keys on YubiKeys and use age-plugin-yubikey to get a usable public
key from it. SSH keys or other key schemes work too.
Sops-nix has an abundance of documentation
on the subject.
Once you have the keys, you need to create the secrets.
sops secrets/homelab.yamlThat will open the file with sops, and it looks like:
hello: Welcome to SOPS! Edit this file as you please!
example_key: example_value

# Example comment
example_array:
  - example_value1
  - example_value2
example_number: 1234.56789
example_booleans:
  - true
  - false
Generate the initial K3S token.
The initial secret for the leader may be generated:
k3s token generate
# or without k3s
openssl rand -hex 16
For this guide, let’s use e68487be15c9df0bd91e7353740c44a0 as the secret (do
not reuse this for obvious reasons). This is the value that will go into the
secrets/homelab.yaml file.
Before encryption, homelab.yaml will look like:
k3s_token: e68487be15c9df0bd91e7353740c44a0Saving and closing that file will encrypt it. Commit and push, or point the labs
repository containing the flake.nix to the absolute path of the secrets
repository.
In the hive template, the lab-secrets module should be imported. In the
configuration for each node,
lab-secrets.settings.k3s = true;Enables access to those secrets.
For the bootstrap, we are setting up the leader node first. Enable k3s and
leader = true for the node you choose to be a leader.
A full leader configuration in Colmena will look like:
node1 = _: {
    imports = [
      ./../machine-specific/rpi5
    ]
    ++ commonImports;
    deployment = {
      targetHost = "node1.lab.lan";
      targetUser = "user";
      tags = [
        "homelab"
        "control"
      ];
    };
    rpiHomeLab = {
      networking = {
        hostId = "00000000";
        hostName = "node1";
        address = "10.10.10.10/22";
        interface = "end0";
      };
    };
    rpiHomeLab.k3s.leader = true;
    rpiHomeLab.k3s.enable = true;
    rpiHomeLab.k3s.longhorn = true;
    rpiHomeLab.k3s.longhornDiskSize = "25G";
    lab-secrets.settings.k3s = true;
    services.k3s.extraFlags = [
      "--tls-san node1.lab.lan"
      "--tls-san node1"
      "--tls-san 10.10.10.10"
    ];
  };
Run the apply
colmena apply --on node1Now we need to retrieve the token K3S generates. This will be prepended with a CA hash. It will look like this:
K10<CA hash>::<credentials>Retrieve it with SSH and copy it:
ssh user@node1

sudo cat /var/lib/rancher/k3s/server/token
Copy the token into k3s_token of the secrets/homelab.yaml. Commit and push.
Enabling K3s
The leader address is in base/default.nix towards the bottom. Only one node is
the leader, and it should be the same across all nodes. Set the address to the
node that we just set up as the leader.
base/default.nix
rpiHomeLab = {
    k3s.leaderAddress = "https://node1.lab.lan:6443";
};
Setting the rest of the nodes to k3s = enable will allow them to join the
cluster. Copy /etc/rancher/k3s/k3s.yaml from the leader node to a local
~/.kube/config to use kubectl with the cluster. Once copied ensure the
localhost address is changed from 127.0.0.1 to point to a node in the cluster.
You made it! The cluster should be working!
Verify the state with kubectl get nodes. You should see a list of nodes and
their ready state. For instance, my output looks like:
➜ kubectl get nodes
NAME       STATUS     ROLES                       AGE    VERSION
amalthea   Ready      <none>                      250d   v1.35.6+k3s1
callisto   Ready      <none>                      309d   v1.35.6+k3s1
elara      Ready      <none>                      97d    v1.35.6+k3s1
europa     Ready      control-plane,etcd,master   309d   v1.35.6+k3s1
ganymede   Ready      control-plane,etcd,master   309d   v1.35.6+k3s1
io         Ready      control-plane,etcd,master   309d   v1.35.6+k3s1
lysithea   Ready      <none>                      244d   v1.35.6+k3s1
All nodes should be ready. A NotReady node means something failed or was not
configured correctly.
Configuring with Kubenix
The templates include configuration for:
- traefik
- metallb setup with an IP Address Pool
- longhorn
Configuration exists in deployments/kubenix.
Note that ServiceLB and the default K3S-managed traffic are disabled with the Homelab NixOS module configuration. This is replaced by MetalLB and the traefik configuration in Kubenix.
Before applying anything, modify the Metal LB Configuration with an IP Address Pool
On my setup, I created a VLAN for 10.10.69.0/22. This allows me to give Metal
LB multiple address pools. The DHCP server hands out leases for physical
machines on a limited range in the 10.10.69.0/24 subnet. That gives me
10.10.68.0/24 for my internal app endpoints and 10.10.70.0/24 for external.
Ensure you include the IP Address pools that you want. This should give more
than enough space for apps on a home network, but choose the subnet prefix and
IP address scheme that suits you.
Applying the Configuration
Build the configuration with
nix run .#kubenixRender the manifests with
nix run .#kubenix -- renderApply the manifests with
# This will prune resources that were removed from the previous apply
nix run .#kubenix -- apply --all
After a few applies, things should be running! I like to use the k9s CLI to look at my namespaces/pods.
Running k9s with different namespaces should result in a view of successfully running pods.
k9s -n kube-system
k9s -n longhorn-system
k9s -n metallb-system
Future posts:
This post is part of a series. It covers initial setup and bootstrap of a k3s cluster deployed with NixOS and Kubenix. Future posts could cover:
- Setting up a Certificate Authority for the lab with
step-ca, OPNSense, and cert-manager/kubenix for HTTPS/TLS traffic. - Setting up additional worker nodes/thinkcentres
- Custom Arduino + mini display for thinkcentre mini pc info/IP Address
- Observability setup with OPNsense/Grafana/Alloy/Loki (kube-prometheus-stack)
- My ArgoCD setup + website
- 2U Mini ITX NAS for a Nix Binary Cache / File Hosting
- Setting up an AWS Build Server for the Impatient
- Longhorn on ZFS
- setting up external reverse proxy gateway incl. the noise protocol
- cross-compiling rust packages to musl and x86 docker images